Quick-Start Guide
This guide gets you from first launch to your first singer in under five minutes.
Prerequesites:
Before anything, install Java 21 minimum. We do not recommend using temurin. Oracle, Bellsoft Liberica, or Azul Zulu all work.
On macOS use ports.
On Linux, you know what to do.
Extract the archive. macOS/Linux mark the qup.sh as executable. Windows just run the qup.bat. You have to run it 3 times to set everything up.
Step 1: Add Your Karaoke Media
Before you can host a show, QUP needs to know where your karaoke files are stored.
- Click the Config icon (gear) in the top right corner of the main window.
- Select Media from the left panel.
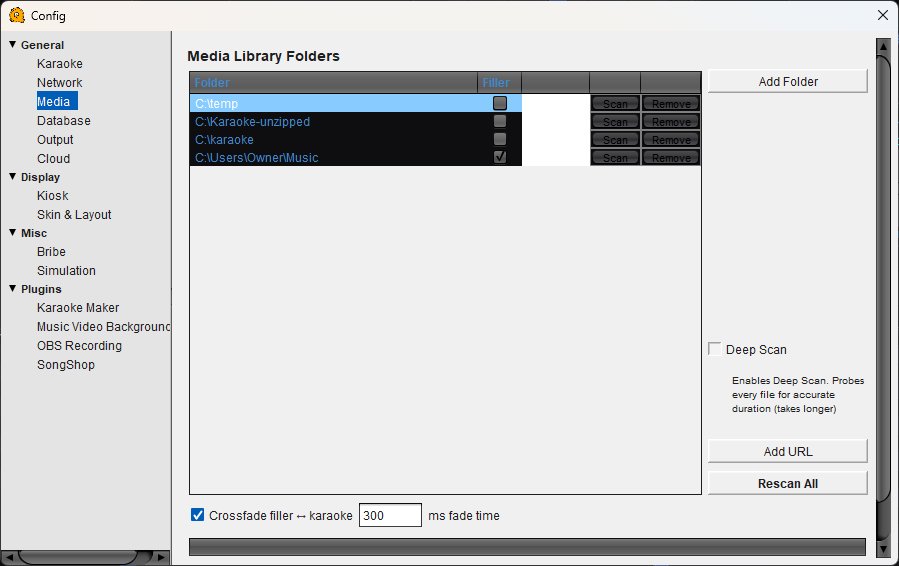
- Click Add Folder and browse to the folder on your computer where your karaoke files are stored (MP3+CDG, MP4, MKV, or ZIP).
- Click Scan next to the folder to build the song database.
- If you have background music for between singers, add that folder too and check the Filler checkbox next to it.
- Close the Config panel.
Your songs will now appear in the Karaoke tab of the Song Browser on the right side of the main window. The total song count is shown in the bottom right corner.
Step 2: Queue a Song for a Singer
There are two ways to queue a song:
Double-Click (Full Options)
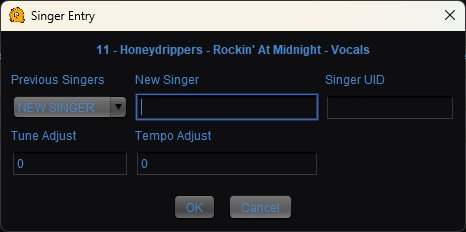
- Find a song in the Song Browser using the search bar.
- Double-click the song to open the Singer Entry dialog.
- Type the singer's name in the New Singer field, or select an existing singer from the Previous Singers dropdown.
- Optionally adjust Tune (pitch) or Tempo if needed.
- Click OK.
The singer is added to the Rotation and their song appears in the Playlist.
Step 3: Start the Show
If Start Playback Upon First Enqueue is enabled in the Karaoke config (it is by default), the first song starts playing automatically as soon as it's queued. Otherwise, click the Play button in the transport controls.
That's it — you're hosting karaoke. For detailed information on every feature, see the full Documentation.